Websphere Commerce Developer SQL Profiling (WCS 7)
1. Copy the downloaded jar jdbcProfiler.jar to
SDP\runtimes\base_v7\lib\ext\
http://www.ibm.com/developerworks/apps/download/index.jsp?contentid=391299&filename=sql_profiler.zip&method=http&locale=worldwide
2. I tried these changes for embedded Apache Derby database, this invloves editing following entry.
in WCDE_ENT70\workspace\WC\META-INF\ibmconfig\cells\defaultCell\applications\defaultApp\deployments\defaultApp\resources.xml
I replaced the driver impl class name as below (highlighted in RED)
<resources.jdbc:JDBCProvider description=”Cloudscape JDBC Driver” implementationClassName=”com.ibm.issw.jdbc.wrappers.WrappedDerbyDataSource”
Database vendor Proxy data source class name Apache Derby com.ibm.issw.jdbc.wrappers.WrappedDerbyDataSource IBM DB2 Type 2 CLI com.ibm.issw.jdbc.wrappers.WrappedDB2DataSource IBM DB2 Type 4 JCC com.ibm.issw.jdbc.wrappers.WrappedDB2JCCDataSource com.ibm.issw.jdbc.wrappers.WrappedOracleDataSource
The installation of the client plug-in uses Eclipse’s update manager.
From your Rational Application Developer menu, select Help > Software updates > Find and install. This brings up the “Install/Update”From your Rational Application Developer menu, select Help > Software updates > Find and install. This brings up the “Install/Update”
- Select Search for new features and then click Next.
- Within the Install dialog, click the New Local Site button.
- Navigate to the location where you extracted your updatesite.zip content. Select theupdatesite folder and then click OK (Figure 5).
Figure 5. Browse for the folder - In the Install dialog, check the checkbox for the newly created local site and make sure all the other sites are unchecked. Click Next (Figure 6).
Figure 6. Install dialog - In the search results, select the RAD SQL Profiler feature and click Next (Figure 7).
Figure 7. Search results - Read and accept the license agreement and click Next (Figure 8).
Figure 8. License agreement


- Select a location where you wish the plug-in to be installed and click Finish. For example, install it next to the WebSphere Commerce plug-ins in
<RAD>\commerce\eclipse(Figure 9).
Figure 9. Install location - When prompted to install an “unsigned feature”, click the Install button (Figure 10).
Figure 10. Jar verification - When prompted, accept to restart Eclipse by clicking the Yes button (Figure 11).
Figure 11. Restart Eclipse


You need to change the listener port for the SQL profiler from the default 26000, this involves following changes
a. Set a JVM custom property “
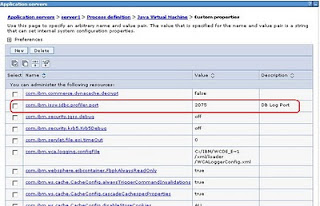
b. Change the listening port number from RAD.
a. Set a JVM custom property “
com.ibm.issw.jdbc.profiler.port" as follows
b. Change the listening port number from RAD.

5. Do a Clean/Publish from your RAD, during startup you should be able to see a similar message as below, this indicates the SQL profiler has started successfully.
00000014 JdbcProfilerD I Jdbc Profiler listening to socket 2075
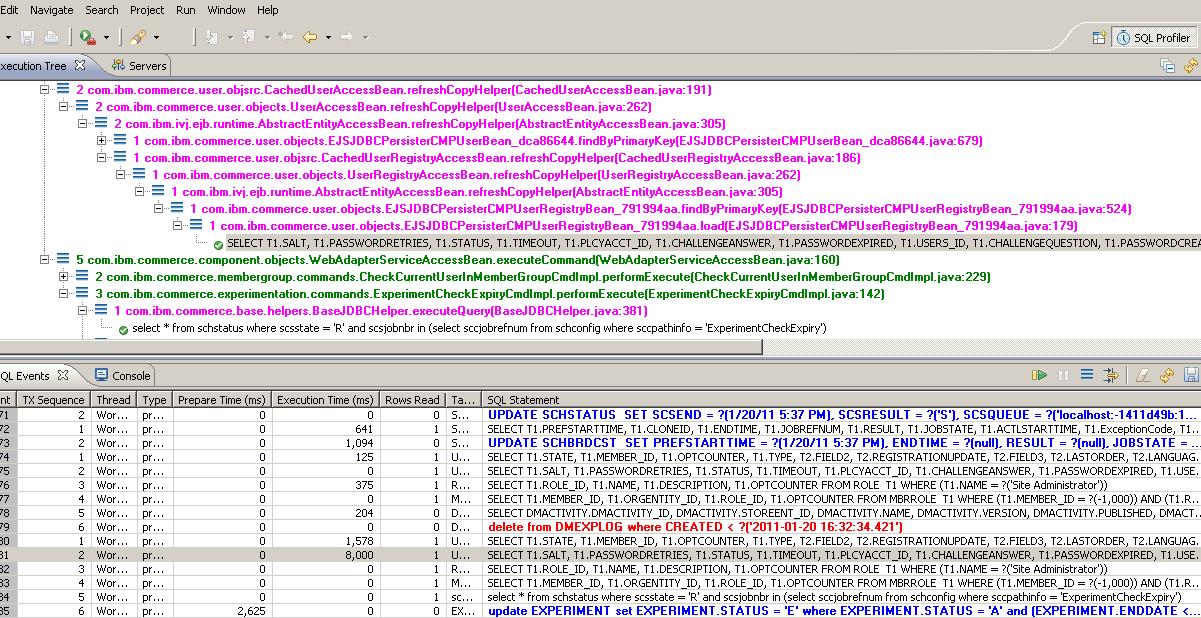
6. During server startup notice that you have selected SQL Profiler Prospective, you should be able to see sql tracing during server startup as shown below.
Enjoy!!
0 comments:
Post a Comment